Foodie

Tuesday, May 29, 2007

Beansprouts

i am sure all of us have experienced the frustration when beansprouts are needed as a condiment and the bag of beansprouts,bought from the supermarket, is discolored, broken and the roots are at least 1/2 inch long. I feel like i am doing prison duty taking the roots off and i needed my mom more than ever, cos she is one who will patiently do this duty for me. Having seen my friend sprouted a batch of perfect beansprouts, gave me the inspiration to give it a try. The first batch was a total failure and i learned alot from this failure. The second and third batch turned out fine and i am now sprouting my fourth batch so that i can cook curry noodles when the beansprouts are ready.

Photo Sharing and Video Hosting at Photobucket

Ingredients:

1/4 cup mung beans
a square one gallon ice cream tub
a bag of pebbles about 3 - 5 lbs
a strainer
few layers of kitchen towel

Method:

Wash the beans thoroughly, and sort out any discolored or defective beans.

Place the beans in the tub, cover them with water, and let them soak overnight in a dark place.
Sprouting in light allows a green color to develop and most people prefer white sprouts.

The next morning, drain off the water using the strainer. Sort beans again, there will be immature beans that have not been soaked through.

Wet the kitchen towel and place on top of beans, then place the bag of pebbles on top. Cover the tub and place in a dark cabinet.

Each day rinse the beans and developing sprouts with lukewarm water, pouring off the excess water each time, rince once in the morning and then in the evening.

By the fourth day the sprouts should be at least 1 inch long .(the beansprouts can be eaten at this stage but i prefer them to be about 2 inches in length which will take another 3 - 4 days)

When the sprouts reach the desired stage of development, wash them in cold water to remove seed coats, fibrous roots, and other residue.

The sprouts are best eaten soon after washing, but can be stored for several days in the refrigerator at 40-45°F.

Serves
Read More......

Thursday, May 10, 2007

Ban Jian Kuih

This is the original Apam Balik and the texture is chewy but the sides are crispy. You can make them in a 10 inch diameter and cut into wedges or have them smaller of which the thickness have to be proportionate to the size. You can even use as little batter as possible to make a crispy pancake. i had to edit all my recipes which 'lye' is mentioned as what i used was actually 'potassium carbonate & sodium bi-carbonate solution' To read about this http://en.wikipedia.org/wiki/Potassium_bicarbonate. i received so many requests for the picture of the bottle , so here it is

Photo Sharing and Video Hosting at Photobucket


Photo Sharing and Video Hosting at Photobucket

Ingredients:

100 g all purpose flour
25 g rice flour
1/8 tsp potassium carbonate & sodium bi-carbonate solution
1/2 tsp bicarbonate of soda
1/2 tbsp dry buttermilk
1/4 tsp salt
50 g sugar
160 ml water

Filling :

100 g chopped roasted peanuts)
80 g castor sugar ) Mix together

2 tbsp Margarine cut into small pieces


Method:

Mix all the ingredients well into a batter and leave aside covered, to rest for at least 30 minutes.

Lightly grease an apam pan(if available) or a 10 inch nonstick frying pan and heat it over a medium low flame.

Pour in all the batter and using the base of the scoop/ladle , spread the batter evenly around and to the sides of the pan. Cover pan.

When bubbles are seen on the surface of the half cooked batter, sprinkle a handful of filling over. Spread the pieces of margarine all over the filling.

Cover the apam and cook further for half a minute.

Remove the cover and use a flat-bladed knife/spatula to release the sides and bottom of the apam and fold into half.

Cool before cutting into wedges.


Recipe 2 with egg

ingredients;
A
125 gm bread flour
15 gm tapioca starch
40 gm sugar
1 egg and top with water to make 150 ml.

B
60 ml/4 tbsp water
1/2 tsp baking soda
1/4 tsp baking powder

1 egg

Method

Blend ingredient A and using hand mixer, beat flour mixture until bubbly and leave to rest for at least 1 hour.

Dilute baking soda, baking powder with water.

After 1 hour, add in egg and beat until well mixed.  Beat in the diluted mixture. Mixture should be thick and runny.

Heat up pan and oil the pan.  use kitchen towel to remove excess oil.

Turn down heat to MEDIUM LOW

Pour batter into pan and using a spoon or soup ladle, push the batter to coat the sides of pan.(if a thick ban jian kuih is desired, use all the batter.  I like to make 3 ban jian kuih with this recipe  your choice)

Let batter cook uncovered until batter has turned bubbly.

Then cover the pan and cook until batter is cooked and the sides has turned brown and crispy.

Sprinkle sugar all over the surface of cake and cook until sugar melts (cover with lid)

Remove cake from pan, brush the surface with butter, then sprinkle peanuts on to half of the cake.

Fold the half without peanuts over and press lightly.

Cut into pieces and enjoy


Serves
Read More......

Monday, May 07, 2007

Apam Balik

This version of the Apam is a spin off from Ban Jian Kuih and is very crispy. It is more of a crispy crepe/pancake but the filling of peanuts, sugar and a dash of butter is the same as Ban Jian Kuih. Seeing how they were made while waiting for your turn in the pasar malam, was amazing, a task i thought was difficult to make at home. The dough was thick and a whole ball of it was put in the heated special apam pan and then the excess was removed leaving a thin layer of dough that was stuck to the pan. This recipe below is totally different although the result of crispy apam is the same. I don't know if it is the recipe or that there is no humidity here that the apam remained crispy throughout.

Photo Sharing and Video Hosting at Photobucket

Ingredients:

170 gm all purpose flour
100 gm rice flour
30 gm cornstarch
2 tsp double action baking powder
1/2 tsp baking soda
1/2 tsp salt
2 large eggs
1 tsp vanilla essence
6 - 7 ozs water
150 gm fine granulated sugar

Filling:

120 g melted butter
150 gm fine granulated sugar
1 cup chopped roasted peanuts

Method:

Mix all the ingredients together, strain and leave in the fridge for at least 3 hours. (i left it overnight)

Heat a crepe pan or a small nonstick pan slightly. (just hot enough for batter to stick to pan)

Pour in a 4 oz laddle of batter and swirl pan so that batter is coating the edge. Remove the excess batter and sprinkle in some sugar on the pancake.

Cook till the bottom of pancake is golden brown.

Sprinkle with melted butter and then chopped roasted peanuts.

Fold the pancake into a half and leave to cool.(it will be crispy as soon as it gets cold)

Serves
Read More......

Chives Dumplings

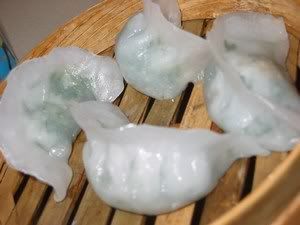
Flat leaved chinese chives, also called garlic chives are the main ingredient rather than an accent in these dumplings. The dumplings are always recognizable by the emerald hue of the filling. This dumpling skin is actually meant of Har Gow and i have attempted many times to make some good dumplings but have failed. So, since i have a patch of chives growing in the garden, i decided to use them as the filling. If this attempt failed, at least i did not waste the expensive shrimps. Surprisingly, this recipe turned out well. It was easy to make but a word of caution though, these dumplings will not keep, they have to be served as soon as they are ready and do not oversteam too.

Photo Sharing and Video Hosting at Photobucket

Ingredients:


Dumplings:
1 1/4 cups wheat starch/tung mein fun
1/4 cup tapioca flour
1/2 tsp salt
1 cup boiling water
1 tsp vegetable oil


Filling:

1 1/2 tsp salt
1/2 lb chinese chives, cleaned, trimmed and cut in 1/2 inch lengths
4 ozs shrimp, peeled, deveined and cut in 1/4 inch dice(about 1/2 cup)
1/2 tsp soya sauce
1/8 tsp ground white pepper
1/2 tsp toasted sesame oil
1 tsp cornstarh


Method:

Dumplings:


Combine wheat starch and tapioca flour and salt.

Add boiling water and the oil and stir with chopsticks or wooden spoon. While the dough is still very hot, turn it out onto a board dusted with 1 tbsp wheat starch.

Knead until smooth, adding a little more wheat starch if neceassary. The dough should be soft but not sticky.

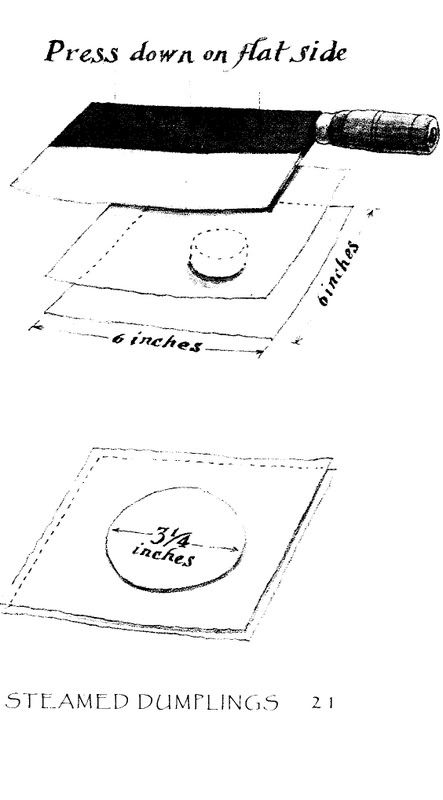
Divide the dough into thirds. Use palm to roll each portion into a 9 inch cylinder. Cover loosely with a slightly damp paper towel to keep the dough from drying out. The dough is now ready to cut and press or roll out as needed.

To make round dumpling wrappers, wheat starch dough can be sandwiched between squares of baking parchment and then pressed flat using downward pressure (i use the pastry scraper). The result will be an almost-perfect circle. Afterward, if you still want your circles larger or a little thinner, roll them out lightly with a rolling pin before peeling away the parchment.

Photo Sharing and Video Hosting at Photobucket

Filling:

Bring 2 quarts of water and 1 tsp of salt to a boil.

Add the chives and blanch for 1 minute over high heat.

Drain the chives in a colander, and rinse under cold water to stop the cooking.

Squeeze the chives dry.

Combine the chives with the remaining 1/2 tsp salt, the shrimp, soya sauce, white pepper, sesame oil and cornstarch.

Set aside.

To assemble:

Make one very narrow pleat that extends from the edge almost all the way to the center of the circle. Make 7 or 8 more narrow pleats alongside, each almost overlapping the last.(i can only manage to pleat 5). Your final pleat should be just over halfway around the circumference of the dough. Press a finger lightly along the inside of the pleats to flatten them slightly and enlarge the pocket within.


Photo Sharing and Video Hosting at Photobucket

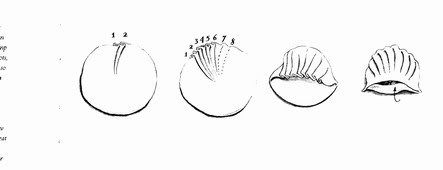
Spoon about a teaspoon of the filling into the pocket, keeping it from touching the open edge of the dough. Pinch the edges of the dough together very firmly.

Repeat with the remaining dough and filling.

Arrange the finished dumplings 1/2 inch apart in an oiled pan. Steam on very high heat for 7 minutes, replenishing the steamer with hot boiling water as necessary between batches.

Brush cooked dumplings with cooked fragrant oil for shine and to prevent from drying out.

Let dumplings rest for a few minutes before transferring them to a serving plate.

Serve hot.

Serves Read More......

Friday, May 04, 2007

Yau Char Kway II

When i made the first successful yau char kway, i was so excited and had to post the recipe before i forget how it should be done. But......., i could not make a good holey yck with that recipe. What happened???????? So, back to the drawing board and with thinking cap on , I came to the conclusion that the process of kneading, resting, stretching and frying the yck have to be improved. This time I have achieved very light, holey yck but they are not so uniform in shape and size, so alot of practise in shaping is needed to make them more presentable.

Photo Sharing and Video Hosting at Photobucket


Ingredients:

3 cups bread flour

7 – 10 ozs water (Denver friends - use 10 ozs)
1 tsp ammonia bicarbonate
1 tsp baking soda
1 tsp alum
1 1/4 tsp salt

Method:

Mix the ammonia bicarbonate, baking soda, alum and salt with 7 ozs water until dissolve.

Add in to the flour and using the end of a wooden spoon, stir in a circular motion until a dough is form – dough should be sticky, if not, add in more water – dough must stick to fingers. I have used as much as 12 ozs altogether to get the dough to be sticky.

Cover with cling wrap and let it rest for 30 minutes.

After 30 minutes, punch down the edge and all over dough with your knuckles for at least 8 punches, then take the dough from the side of bowl, lift it as high as it can go and fold in the middle - 4 folds will do . Let is rest for 15 – 20 minutes.

Repeat the punching , folding and resting for 3 – 4 times more.

Next, oil your fingers and dough, lift it up and overturn it, oil the top so that it will not dry. Wrap tightly with cling wrap, and leave in the fridge for 1 hour.

After 1 hour, remove from bowl, divide into 2 portions and fold in to make a long smooth elastic dough. Wrap it back with greased cling wrap. Then put in a Ziploc bag and leave in the fridge for 3 – 4 hours.. Leaving in the fridge, well wrapped, overnight is better – the dough is easier to handle and the result is lighter.

Heat a large wok with oil half full.

After 3 – 4 hrs or overnight, lightly flour the pastry board .

Spread dough into a flat long 2 inch wide and 1/4 inch thick. Use a rolling pin to aid the spreading.

Cut into ½ inch strips.

Check oil temperature, it must be more than 350 f to begin frying.

Using a bamboo skewer, dip in water and dap very little in the middle of a strip of dough. Top with another strip and using a dry lidi(bamboo skewer)or a chopstick,press down horizontally in the middle of the two strips to adhere.

Pull and stretch the pressed strips until as long as possible, and put the stretched strip in the hot oil. (I stretch a pressed strip until it resists, then do the next and when I finished the rest, I come back and stretch the first and so forth)(i found that the stretched dough has to be stretched uniformaly to achieve a presentable yck)(if you have a buddy to help to do the frying and turning, you could stretch and put to fry one at a time)

When the yck floats to the top, use a pair of chopsticks and turn the yck. Keep on turning until it has finished expanding.

Fry until slightly brown. Remove from oil

Repeat with the rest of the strips until all are done. .(yck can be packed well wrapped and leave in freezer and it can be re fried or baked in the oven)

Re fry all the yck until crispy.

Preheat oven at 250 – 300 f and leave the yck in the oven for 10 minutes to rid of some oil.

Serves

Read More......

Wednesday, May 02, 2007

Doughnuts

There are cake doughnuts which the name speaks for itself. This is raised doughnut which is like sweet bread. I still am not accustomed to the cake doughnuts with all sorts of glazes and toppings. To me, plain old raised doughnut with a light coating of fine sugar is to die for.

Photo Sharing and Video Hosting at Photobucket

Ingredients:

2 1/4 cups unbleached flour/bread flour
1 1/2 tbsp fine granulated sugar
1/2 tsp salt
1 1/2 tsp instant yeast
1 1/2 tbsp butter
1 large egg
130 ml whole milk

Method:

Combine flour, fine granulated sugar, salt, yeast, egg and milk in a mixing bowl. Knead dough until smooth and elastic. Add in the butter and continue to knead until well combined.   Cover with a clingwrap and leave to rise until double.(i used the breadmachine - put all the ingredients in the breadmachine bowl with the yeast last)
.
When the dough has finished its first rising, punch down the dough and remove it out onto a lightly floured surface. Cover with damp cloth and let it rest for 5 minutes.

Roll dough out to 1/2 inch thickness.

Cut with a doughnut cutter (i use a tuna can and an one inch lid) and place the dough pieces on a greased tray.

Cover with a damp cloth and leave to rise for 30-40 minutes until double in size.

Deep fry doughnuts in hot-oil. Turn frequently until the doughnuts are golden brown and puffed up.
.
Coat doughnuts with fine granulated sugar while they are still warm.

Serves
Read More......
Related Posts Plugin for WordPress, Blogger...